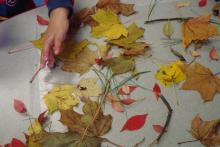
 I was very inspired to try making a “sticky table” after seeing the Pumpkin vines on the sticky table activity created by Deborah Stewart on the Teach Preschool site. I thought this would work very well with various items in nature that we have outside during this time of year.
To set this up, I cut a large sheet of clear contact paper and used clear packing tape to adhere the contact paper (sticky side up) to the table so it wouldn’t move around. To have some variety of items, I brought in a collection of leaves, pine branches and small pinecones from home. The children also gathered other leaves and sticks from the playground outside. Depending on the season, you can select other items like flowers, clovers and blossoms.
Then we had the children explore their treasures on the sticky table. They played around and noticed that some things didn’t “stick” so well (like larger sticks). But it’s great for them to explore that. They loved the small pinecones I had found from home — and they had to learn to press down on those to make them stick. Most of the children just liked “sticking” the items to the contact paper. Others tried to fill up all the open space. And some children tried to make shapes of other things out the materials – one girl arranged some small red leaves like flower petals. I heard another say “Look, mine looks like a dragonfly!”. And still others liked walking their fingers across the paper and feeling how they stick!
The contact paper allowed for children to explore the items and be able to move them around (it’s sticky – but items are repositionable). After they were done playing, we folded over the contact paper and sealed it. This makes for a good display to be hung in the classroom or put into the science center, where children can touch it and feel the impression of the items underneath.
I think in the Spring I’ll bring the contact paper OUTSIDE and attach it to a picnic table and make a nature collage there!
What other kinds of things can you do with a sticky table?


Leave a Reply